Entra ID (previously Azure AD)
To set up federated authentication using Microsoft Entra ID, follow the steps outlined below.
Pre-requisites
The Objective ID system needs to read the following profile fields from each user's AD profile.
-
First Name
-
Last Name
-
Email
The following Microsoft Graph API permission will also be required in the Azure app registration. Steps for adding this registration are explained in more detail in the next section.
-
User.read
-
email
-
openid
-
profile
Microsoft Entra ID configuration steps
New app registration
-
Log into the Microsoft Azure Portal as a user with administration rights for creating a new app registration within Microsoft Entra ID - Azure Portal
-
In the Azure portal home page go to 'Microsoft Entra ID'
-
In Microsoft Entra ID Click 'Add' and then select 'App registration', or alternately choose 'App registrations' from the navigation pane and then click 'New registration'
-
In the 'Register an application' page enter:
-
Name for the application, e.g. 'Objective ID'
-
Supported account types: Select Accounts in this organisational directory only (the default option) unless a different setting in required for your AD environment..
-
Redirect URI: Select Web and enter the Objective ID production endpoint URI:
https://objectiveidpapacprod.auth.ap-southeast-2.amazoncognito.com/oauth2/idpresponse
-
After entering the details, click Register to create the new app registration
-
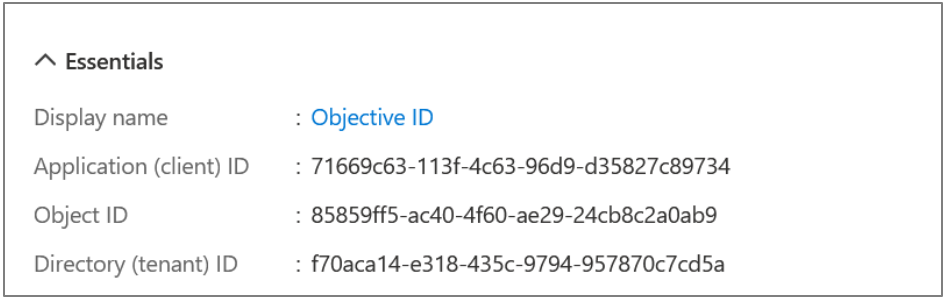
Once the app is registered, you will be directed to the Overview page for your app registration. Please take a note of the following details:
-
Application (client) ID - this is shown near the top of the overview page
-
OAuth 2.0 authorisation endpoint (v2) - Click the Endpoints button at the top to see the list of endpoint URLs
Example below:

Adding API permissions
-
In the naviagtion pane on the left side of the page, click API permissions.
-
By default, they User.Read delegated permission for Microsoft Graph API should be granted.
-
Click Add a permission, then select Microsoft Graph from the Microsoft APIs list, and choose Delegated permissions.
-
In the list of available permissions, select and enable the following OpenID permissions:
-
email
-
Openid
-
profile
Then click Add permission to confirm.
-
Once added you should see all the required permissions listed:
-
email
-
openid
-
profile
-
User.Read
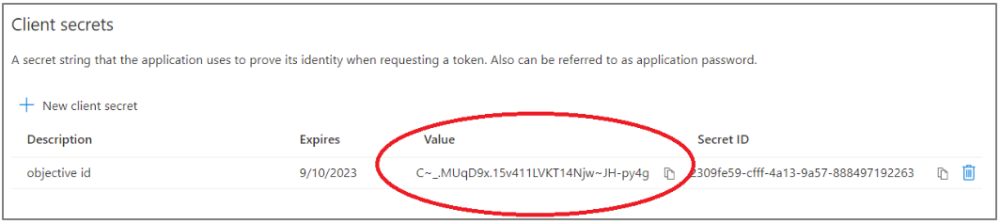
Add a client secret
A client secret needs to be created so that the Objective ID system can prove its identity when requesting a token.
-
Click Certificates & secrets in the navigation pane. Then click New client secret. Enter a descriptive name such as Objective ID secret, select an expiry of 24 months and then click Add.
Note: To prevent users being unable to Objective Trapeze in the future it's important to set a reminder at least 3 weeks in advance of the secret expiry date to create a new secret value and notify Objective Trapeze Support Team that an update is required.
-
The new client secret will be listed, please take a temporary note of the Value text. This will be sent to Objective via a secure channel in the next step.
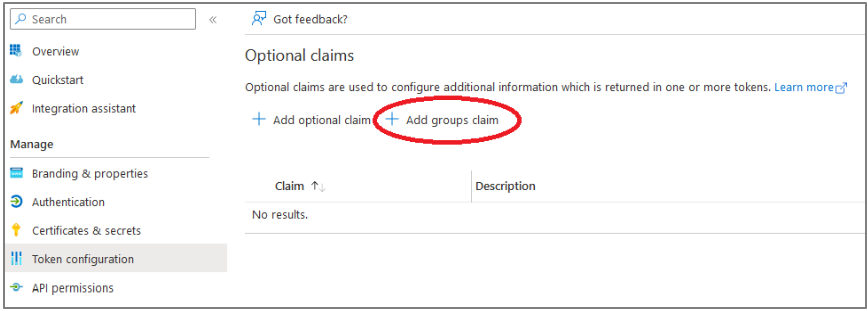
Add a groups claim
In order for the Objective ID system to read your user AD group memberships you need to add a groups claim. This enables you to use AD groups when administering Objective products so that your AD group membership management automatically flows through to your Objective products and you do not need to perform additional Objective product group membership management manually.
-
In your App registration, Click Token Configuration in the navigation pane on the left side of the page.
-
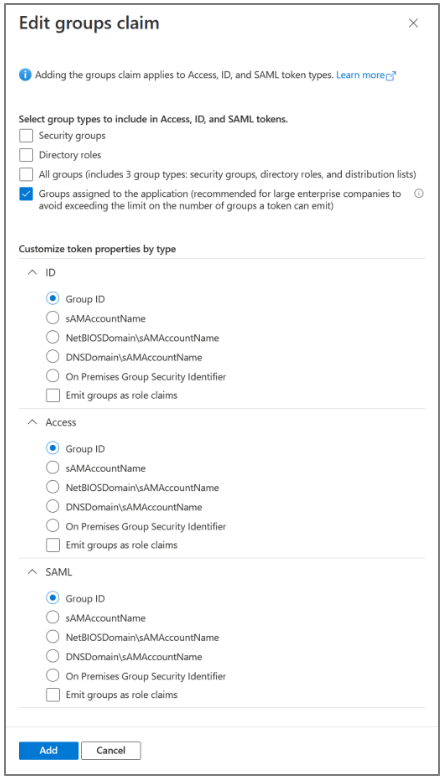
Click Add groups claim and select Groups assigned to the application from the types to include, then click Add.
-
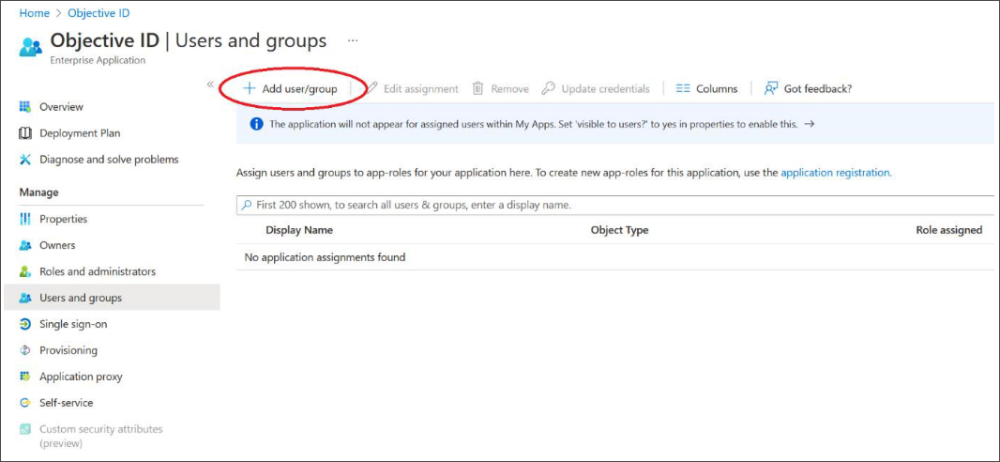
Next go back to your Default Directory > Enterprise Applications and select your app registration for Objective ID
-
Click Add user/group and follow the steps to select the groups that you wish to use with Objective ID
-
Submit your app registration details to Objective
Using a secure mechanism for data transfer such as Objective Connect please provide the following info to Objective:
-
Application (client) ID
-
OAuth 2.0 authorisation endpoint URL
-
Secret value
Note: Please email Objective Trapeze Support Team to request access to a secure Objective Connect workspace if you have not already been provided one. Alternatively, if you prefer you may use any secure mechanism to transfer this data that you're comfortable with, e.g. Citrix ShareFile etc.
Using federated sign in
After receiving your App registration details Objective will make a corresponding registration in the Objective ID system. Once completed, Objective will notify you that you can begin using federated sign in.
-
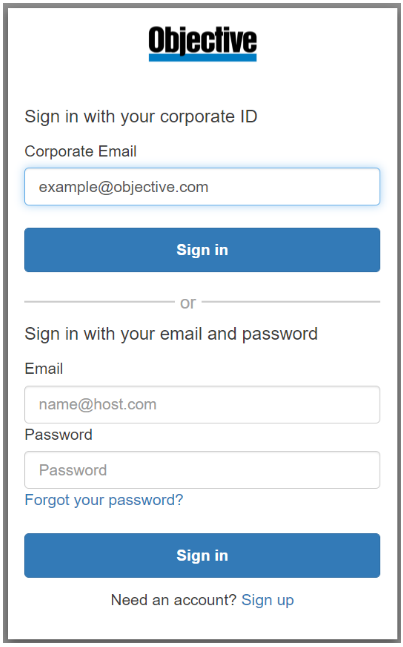
When signing into Objective Trapeze the user will be prompted to enter their email address.
-
Use the "Corporate Email" field to sign in using federation
-
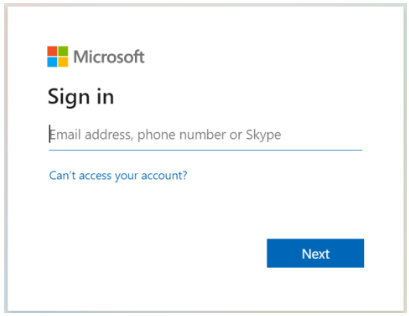
The user will be redirected to your identity provider for authentication, e.g. Microsoft Entra ID
-
Upon successful login the user token will generally be cached so that the user can sign in automatically in future. The authentication steps may vary depending on your Microsoft Entra ID configuration.